ngStartup
Overview
ngStartup is a project for development of robust single page applications with AngularJS 1.4.x and other modern tools.
You can think about ngStartup as "a complete starting point for your apps".
Installation
Clone ng-startup repository from github or use our builder.
$ sudo npm -g install grunt-cli karma bower
$ git clone git@github.com:corley/ng-startup.git
$ cd ng-startup
$ npm install
Npm will install nodejs by package.json then bower dependencies (we'll talk about that later.) The installation is completed.
Getting Started
After installation run:
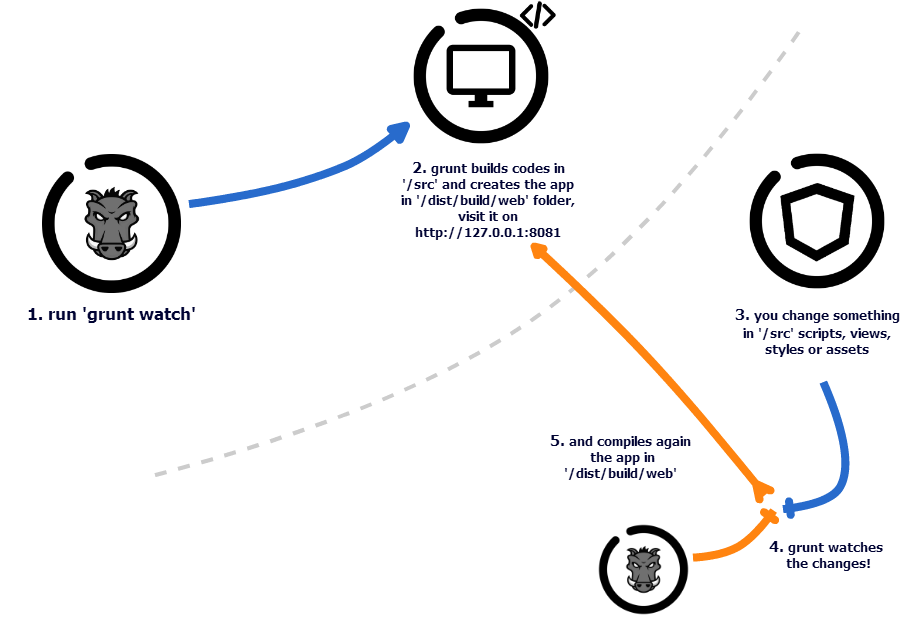
$ grunt watch
ngStartup (thanks to Grunt) compiles your app creating a development version that you can visit on http://127.0.0.1:8081.
The Single Page Application
ngStartup provides a single page application structure (SPA), where you have a single html file (the index.html) with ng-app initialized on the <html> tag.
Your controllers will be injected in the body working with easy to define routes.
Thanks to tools such as Bower & GruntJS you can work very quickly with ngStartup: you can define, download and integrate external components and libraries with Bower, and Grunt will compile your app both for web and mobile releases.
As single page application, you have just a html file. The /src/index.html it's similar to this one:
<!DOCTYPE html>
<html ng-app="ng-startup" ng-controller="AppCtrl">
  <head>
  </head>
  <body>
    <div class="container">
        <div ui-view="main" ></div>
    </div>
  </body>
</html>
AppCtrl is the main controller that you find in /src/app/app.js:
angular.module(
  'ng-startup',
  [
    'my-first-module'
    // list of dependencies
  ]
)
.config([function myappConf() { }])
.run([function run() { }])
.controller('AppCtrl', ['$rootScope', function AppCtrl($rootScope) { }]);
Each module that you want to create will be placed under /src/app/app.js and will have a structure like this:
angular.module( 'my-first-module', ['ui.router.state'])
.config(function config( $stateProvider ) {
  $stateProvider.state( 'home', {
    url: '/home',
    views: {
      "main": {
        controller: 'HomeCtrl',
        templateUrl: 'home/home.tpl.html'
      }
    }
  });
})
.controller( 'HomeCtrl', ['$scope', '$stateParams', function HomeController( $scope, $stateParams ) {
  $scope.name = "Bruce Wayne";
}])
;
and a template home/home.tpl.html like this:
<p>Hello {{ name }}</p>
It's very easy: the module work on route home: it means that if somebody visits the 127.0.0.1:8081\#home path ngStartup will run the controller HomeCtrl with the view home/home.tpl.html and put the result into <div ui-view="main" ></div> of the index.
What happens?
The flow is very simple:
- your code is under
/src. Here you find the index.html and your angular files - grunt prepares the folder
/dist/build/web - grunt parse javascript files, views, assets and less/sass under
/srcand compile & move them to/dist/build/web - grunt copy bower dependecies (js and css) and pastes them in
/dist/build/web - grunt starts a local server that points to
/dist/build/webso you can visit the app onhttp://127.0.0.1:8081
Remember that you work under
/srcand your app (compiled in development stage) is under/dist/build/web
How to develop with ngStartup
When you are in development phase, edit files in /src and run one of these commands:
$ grunt build:web # it creates the web version in /dist/build/web (not minified or compressed) and run tests
$ grunt build:mobile # it creates the phonegap version in /dist/build/mobile (not min. or compressed) and run test

# or

grunt watch # it creates the /dist/build/web, starts the local server and watches changes in /src re-building dist at any change, useful while coding
The app created in '/dist' is debuggable because it is not concatenated, compressed or minified.
How to release for production
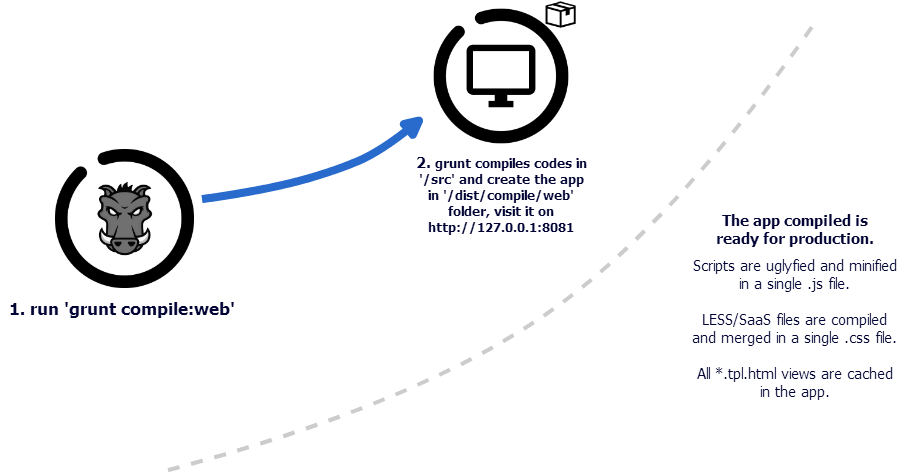
When you're ready, you can create the minified and compressed version
$ grunt compile:web # it compiles in `/dist/compile/web`
$ grunt compile:mobile # it compiles in `/dist/compile/mobile`
Now you can try in on http://127.0.01:8081 or deploy the code to your server.
# App structure and config
Overview
This is the structure of ngStartup:
.
├── src/                            # folder with source of your application: you code here
├── config/                         # folder with app and project configuration
├── dist/                           # folder (out of git) created during compiling
├── bower.json                      # Grunt configuration file
├── bower_components                # folder (out of git) that contains external libraries
├── Gruntfile.js                    # Grunt configuration file
├── LICENSE                         # license
├── node_modules                    # folder (out of git) that contains npm modules
├── package.json                    # npm metadata and project description
└── README.md                       # presentation file and documentation
As you can see the original project (before installation) has just /src and /config folders. Other folders (/bower_components, /dist, /node_modules) will be created by npm install but are ignored by git.
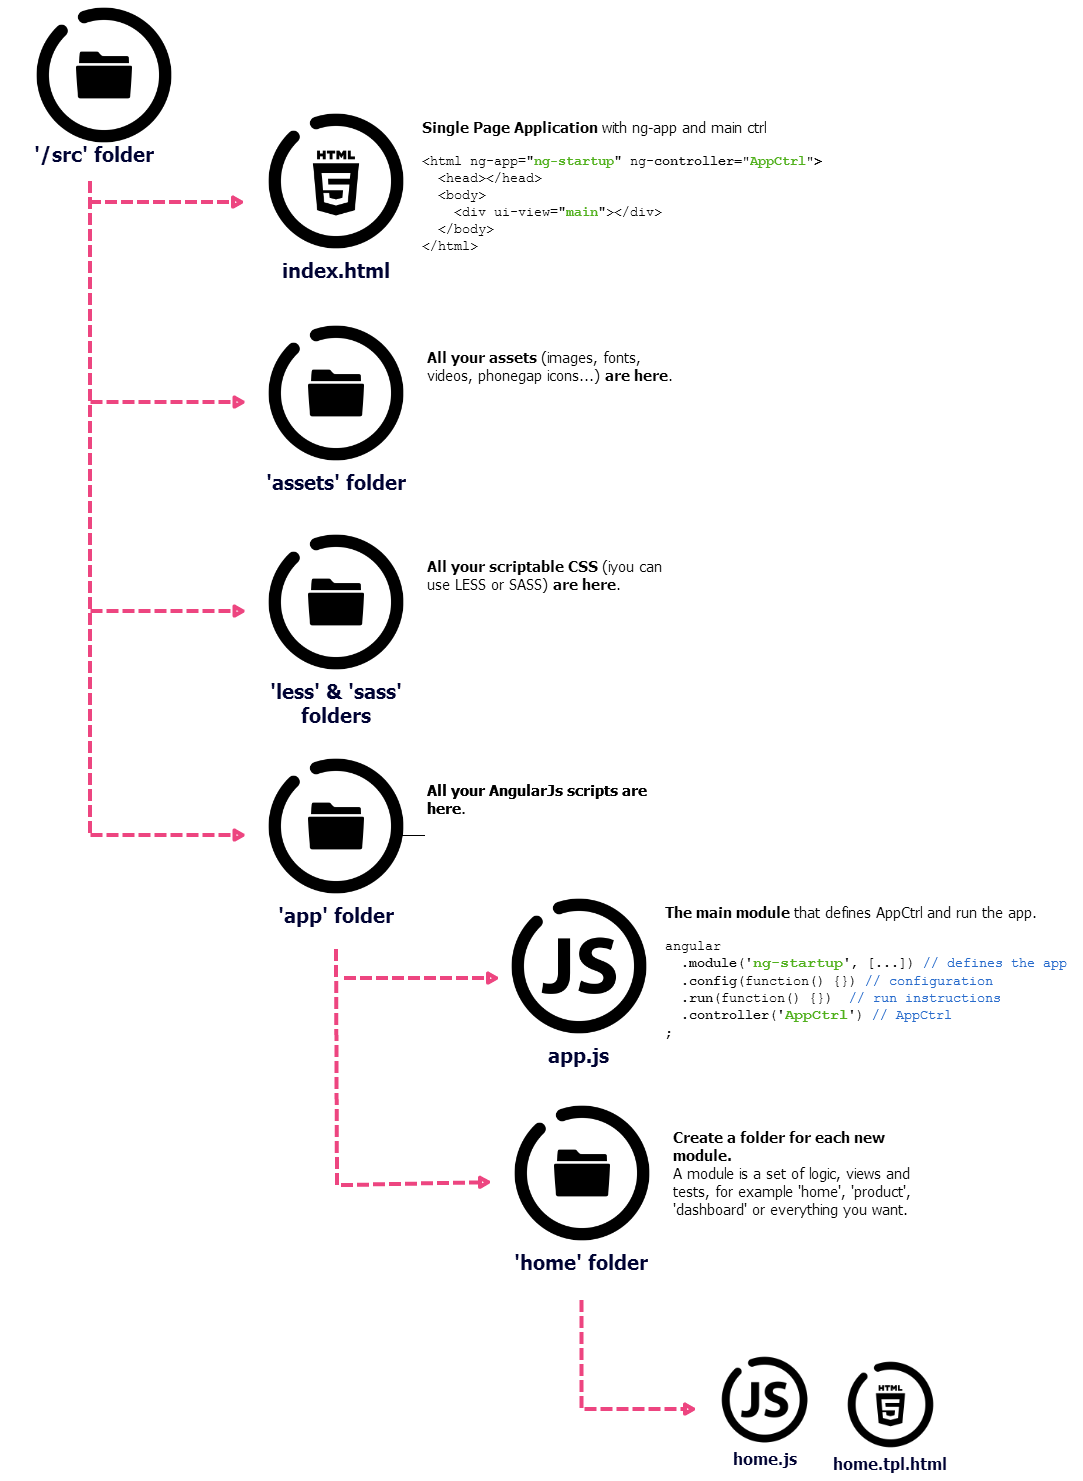
The /src folder
The /src folder contains all your angular files, styles and assets. When you start working with ngStartup, you can edit all these files adding your logic, images, and more.
.
└── src                          # source of your application
 ├── app                         # your app modules (for example: news, home, login...)
 ├── common                      # your common modules (for example: header, directives, helpers)
 ├── assets                      # images, videos, fonts and layou elements
 ├── i18n                        # translations in json format
 ├── index.html                  # the index of your single page application
 ├── less                        # less files (will be transformed into css)
 └── sass                        # sass files (will be transformed into css)
The /src folder is very important because contains all your codes. The most of you job will be inside this folder. Let's go to see that more in detail:
Under Modules chapter you can see how to add new modules in this folder.
When you run grunt build, watch and compile tasks, the code in /src is compiled and moved with external dependencies (bower_components) into /dist folder. This strategy helps you to code better because the final result (in /dist/compile) is a minified, uglified, compressed and optimized app ready for production.
The /config folder
The config folder contains several configuration files:
.
└── config                          # folder with app and project configuration
    ├── build.config.js             # list of js, css and assets files that will be used in compiling
    ├── secret.json.dist            # template for secret.json
    ├── secret.json                 # conf out of git for security and private keys (phonegap token, AWS s3 keys...)
    ├── karma-unit.tpl.js           # test settings
    ├── module.prefix               # Wrapper function for compiled scripts
    ├── module.suffix               # Wrapper function for scripts
    └── phonegap.config.xml         # phonegap/cordova configuration
You should configure you app changing:
package.jsonchanging the name, description, version and other infosbower.jsonwith new dependencies/config/build.config.jswith new dependency files and switching less/sass (choose the best for you)/config/secret.jswith reserved credentials for Phonegap Build and AWS S3 (out of git)
For points 2 and 3 go to Grunt and Bower chapter.
About point 4: this file is out of vcs (version control system): it contains secret keys used by Grunt to compile your app con build.phonegap.com and to upload your app to Amazon S3. In this way you'll never your passwords to git.
App configuration
The /src/common/conf.js file is a configuration file for your angular modules.
Thanks to a specific Grunt task, this file can be filled with different information for build and compile stages. Watch at an example of config file:
angular.module('ng-startup.appConf', [])
// env: build
.constant('appConf', {
  "endPoint": "http://rest.test.corley.it/",
  "defaultLanguage": "en_EN",
  "debug": true
})
// endenv
// env: compile
.constant('appConf', {
  "endPoint": "http://rest.test.corley.it/",
  "defaultLanguage": "en_EN",
  "debug": false
})
// endenv
;
When you launch grunt build:web, grunt build:mobile and grunt watch the lines of code between // env: compile and // endenv will be dropped. The result in compiled app will be:
angular.module('ng-startup.appConf', [])
.constant('appConf', {
  "endPoint": "http://rest.test.corley.it/",
  "defaultLanguage": "en_EN",
  "debug": true
})
;
In /src/app/app.js and whenever you want, you can use the appConf constant:
angular.module(
  'ng-startup',
  [
    'ng-startup.appConf'
    // list of other dependencies
  ]
)
.config(['$logProvider', 'appConf', function myappConf($logProvider, appConf) {
  $logProvider.debugEnabled(appConf.debug);
}]);
At the other side, when you run grunt compile:web and grunt compile:mobile tasks, the lines of code between // env: build and // endenv will be dropped. In the example above your app will enable $log debugging for build stages, and disable for compile stages.
Phonegap configuration
Phonegap/cordova apps needs a config.xml file with list of plugins and other settings. Please refer to Cordova/Phonegap chapter to know how to edit /config/phonegap.config.xml file.
# Modules
Overview
In ngStartup you can easily add your code into your application. The app structure helps you to easily define independent and reusable modules.
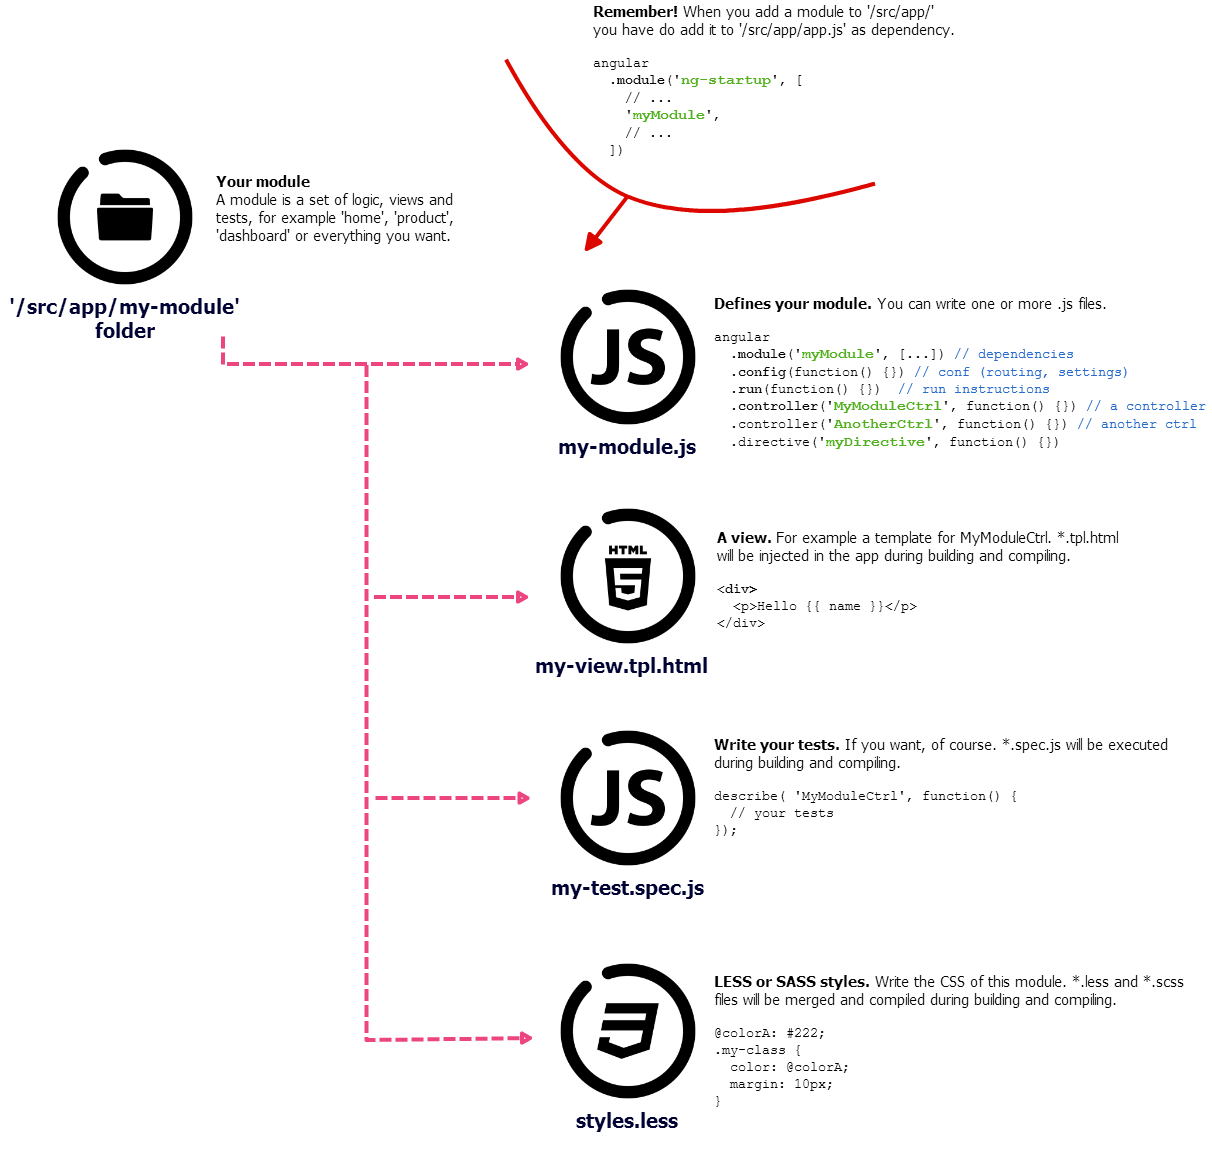
Module structure
A module is a set of:
- the logic (js files with your services and controllers)
- views (.tpl.html files)
- styles (.less or .scss files that will be processed by Less or Sass)
- tests (spec.js with your test definitions)
For example, to create a module that manages controllers and views for the home page, you have just to create a folder into /src/app:
.
└── src
    └── app
        └── home
            ├── home.js       // controllers and services
            ├── home.tpl.html //  a view for a ctrl defined in home.js
            ├── page.tpl.html //  another view for a ctrl defined in home.js
            ├── home.less     //  styles for this module
            └── home.spec.js  //  tests for this module
The following infographic shows better the structure of a module:
How to create a module
You can place your modules in two different folders:
/src/appfor main modules with a specific logic and goal (exp: a module to manage news)/src/commonfor reusable modules, (exp: layout components, modules rich of directives, helpers)
When you add a new module, probably you would to define controllers, filters and services related to it. About controllers you can define the routing rules inside the module. In this way your module will be injected in your app without editing external files (exp the app configuration).
angular.module( 'ng-startup.home', ['ui.router.state'])
.config(function config( $stateProvider ) {
  $stateProvider.state( 'home', {
    url: '/home',
    views: {
      "main": {
        controller: 'HomeCtrl',
        templateUrl: 'home/home.tpl.html'
      }
    },
    data:{ pageTitle: 'Home' }
  });
  $stateProvider.state( 'page', {
    url: '/page/:pageId',
    views: {
      "main": {
        controller: 'PageCtrl',
        templateUrl: 'home/page.tpl.html'
      }
    },
    data:{ pageTitle: 'Info'}
  });

})
/**
 * Home controller
 */
.controller( 'HomeCtrl', ['$scope', '$stateParams', function HomeController( $scope, $stateParams ) {
  //do something
}])
/**
 * Page controller
 */
.controller( 'PageCtrl', ['$scope', '$stateParams', function PageController( $scope, $stateParams ) {
  $scope.pageId = $stateParams.pageId;
  //do something
}])
;
Remember to add the new module as dependency of ngStartup in /src/app/app.js
angular.module(
  'ng-startup',
  [
    'ng-startup.home',
    // other dependencies
Routing
In the example above we defined in the .config the rules for routing. In this way all calls to /home will be managed by the HomeCtrl with the view home.tpl.html, and all urls like /page/about-us will be managed by PageCtrl with the vide page.tpl.html. Thanks to ui-router you can set your routes in a simple way. You have to define a state (such a name for the route) that must be unique in the app. When you create your module, remember that you can set different states with route associated that will join a controller and his view:
//...
.config(function config( $stateProvider ) {

  //will match #/search url
  $stateProvider.state( 'search', {
    url: '/search',
    views: {
      "main": {
        controller: 'SearchHomeCtrl',
        templateUrl: 'search/home.tpl.html'
    },
    data:{ pageTitle: 'Home' }
  });

  //will match url like #/search?q=google
  $stateProvider.state( 'search.results', {
    url: '/search?q',
    views: {
      "main": {
        controller: 'SearchResultsCtrl',
        templateUrl: 'search/results.tpl.html'
    },
    data:{ pageTitle: 'Results' }
  });

  //will match url like #/search/archive/123
  $stateProvider.state( 'search.archive', {
    url: '/search/archive/:id',
    views: {
      "main": {
        controller: 'SearchArchiveCtrl',
        templateUrl: 'search/archive.tpl.html'
    },
    data:{ pageTitle: 'Old search' }
  });
})
When you pass params to the controller, you should inject $stateParams and $state to manage data and redirect to states.
.controller('SearchArchiveCtrl', ['$scope', '$state', '$stateParams', function($scope, $state, $stateParams) {

  console.log($state.params.id); // 123
  console.log($stateParams.id);  // 123
  if( $stateParams.id == 100) {
    $state.go('search');
    // redirect to state 'search' (url #/search)
  }
  else {
    $state.go('search.archive', {'id': '100'});
    // redirect to state 'search.archive' with id 100 (url #/search/arcive/100)
  }

})
Views and layouts
Views
The router in ngStartup will match an url joining the correct controller and view. A view is just an html template with own $scope:
<div>
    <p>Hello {{ name }}</p>
</div>
The result will be compiled in the DOM of the index.html, showing the result on the browser of your visitors.
The main key is related to the directive ui-view in /src/index.html:
<body>
    <div class="container">
        <div ui-view="main" class="fading-view" ></div>
    </div>
</body>
Multi-views
To use a double-column layout, you have to do something like that:
<body>
  <div class="container">
    <div class="row">
      <div ui-view="left" class="col-lg-3" ></div>
      <div ui-view="main" class="col-lg-9 fading-view" ></div>
  </div>
</body>
and in your modules:
//...
.config(function config( $stateProvider ) {
  $stateProvider.state( 'home', {
    url: '/home',
    views: {
      "main": {
        controller: 'HomeCtrl',
        templateUrl: 'home/home.tpl.html'
      },
      "left": {
        controller: 'LeftCtrl',
        templateUrl: 'left/left.tpl.html'
      }
    },
    data:{ pageTitle: 'Home' }
  });
})
Less & Sass
When you build the app (both for development or production stages) all .less and .scss are compiled to create the definitive .css.
In /src/app/less/ and /src/app/sass/ folders you can find css scripts for your application. But if you want add specific styles for a module, just add less and scss files into the module folder.
A less example of /src/app/home/home.less:
@home-color: #000;
.home-page {
  background: #fff;
  color: @home-color;
}
Tests
To write tests for your module, create *.spec.js into module folder.
All tests defined will be launched at build and compile tasks, so are sure that your application is ready to be released.
An example of stupid test:
describe( 'home section', function() {
beforeEach( module( 'ng-startup.home' ) );
  it( 'should have a dummy test', inject( function() {
    expect( true ).toBeTruthy();
  }));
});
# Grunt and Bower
Overview
Grunt and Bower are two node modules that help you with development and dependency management.
Grunt tasks
Grunt is a node tasks manager that helps you to configure and reuse your application flow.
With Grunt you can easily compile your source code (/src) for different stages (development and production) and platforms (web and mobile)
The first command you have to know is
$ grunt watch
This command will compile your /src creating a version (in /dist/build/web) that you can visit on http://127.0.0.1:8081, then will wail for any change to codes in src/ rebuilding again the app when you edit your files. Launch this command when you are coding.
Another important command is
$ grunt compile:web
It compile your /src creating a version (in /dist/compile/web) ready for production, with js and css files minified an compressed, and with angular html templates injected into the app in order to enhance the performance. Then it starts a server (as the watch command) available at http://127.0.0.1:8081.
All commands
| Command | Description |
|---|---|
| build:web | creates the app (not minified or compressed) in the /dist/build/web folder and executes all tests |
| build:mobile | the same of above, but in the /dist/build/mobile using files and instructions for mobile env, then creates a zip with your config/phonegap.config.xml and pushes this archive to /build.phonegap.com (with credentials in /config/configuration.json), waits for building process ending, then downloads the apk and installs it on device (is connected on usb) |
| watch | the same of build:web, but doesn't execute the tests and starts the server (http://127.0.01:8081) watching&recompiling at any changes to the code. best task when you're coding |
| compile:web | creates the app (minified and compressed) in the /dist/compile/web/ folder and executes all tests, then starts the server (http://127.0.01:8081) best task to produce the app ready for deploy |
| compile:mobile | the same of above, but in the /dist/build/mobile/ using files and instructions for mobile env, then creates a zip with your /config/phonegap.config.xml and pushes this archive to build.phonegap.com (with credentials in config/configuration.json), waits for building process ending, then downloads the apk and installs it on device (is connected on usb) |
| test:web | run tests for /dist/build/web |
| test:mobile | run tests for /dist/build/mobile |
| bump:patch | edit the package.json increasing the app version, for example from 0.1.0 to 0.1.1 |
| bump:minor | edit the package.json increasing the app version, for example from 0.1.0 to 0.2.0 |
| bump:major | edit the package.json increasing the app version, for example from 0.1.0 to 1.0.0 |
Please read official documentation for GruntJS.
Grunt helps you to write better code, notifying any javascript syntax error or wrong practices that could affect the minification of the app.
List of Grunt dependencies
This is the list of our dependencies
grunt.loadNpmTasks('grunt-contrib-clean');
grunt.loadNpmTasks('grunt-contrib-copy');
grunt.loadNpmTasks('grunt-contrib-jshint');
grunt.loadNpmTasks('grunt-contrib-concat');
grunt.loadNpmTasks('grunt-contrib-watch');
grunt.loadNpmTasks('grunt-contrib-uglify');
grunt.loadNpmTasks('grunt-contrib-compress');
grunt.loadNpmTasks('grunt-bump');
grunt.loadNpmTasks('grunt-aws');
grunt.loadNpmTasks('grunt-contrib-less');
grunt.loadNpmTasks('grunt-contrib-sass');
grunt.loadNpmTasks('grunt-shell');
grunt.loadNpmTasks('grunt-karma');
grunt.loadNpmTasks('grunt-devcode');
grunt.loadNpmTasks('grunt-phonegap-build');
grunt.loadNpmTasks('grunt-ng-annotate');
grunt.loadNpmTasks('grunt-html2js');
grunt.loadNpmTasks('grunt-http-server');
Bower
Bower is a package manager, ngStartup uses it to download its frontend dependencies (for example angular.js and jQuery).
Bower.json contains metadata and requirements for your application. install command is executed by npm install but it supports few other commands.
You can think at 2 different groups of sources in the app: a part from
/src(your sources) and a part from/bower_components(external libraries) downloaded by Bower
Add a new dependency
To add a dependency, edit /bower.json:
  //...
  "dependencies": {
    "bootstrap": "~3.3",
    "add-your-dependecy-here": "version-or-repo-zip-url"
  }
Then run the command:
$ bower update
It will download the package in the /bower_components folder.
The last step is choose which css and js files you want to import into the app, editing the build.config.js file.
The /config/build.config.js contains the description of files loaded in your application. You can add bower dependencies, different path for your javascript and a lot of other customization.
It manage also phonegap assets, you can decide to load a particular css only for phonegap or only for web version:
  vendor_files: {
    js: [
      'bower_components/angular/angular.js',
      'bower_components/jquery/dist/jquery.js',
      'bower_components/bootstrap/dist/js/bootstrap.js',
      'bower_components/your-dependecy/dependency.js'
      // ...
    ]
These files will be added in the compiled index.html.
# Sessions, ACL and identity
Overview
ngStartup includes crAcl, crSession and crIdentity from ngUtils to let you to easily manage identities, authentication and sessions along the whole app.
This modules let you to
- define roles and visibility for each route
- manage and store data into session (localStorage and cookie)
- manage user's identity (guest, logged users...) along the whole app and restore it after a refresh or new tab
- make login with different auth providers (OAuth, OAuth2, Basic Auth, Facebook, Google, Linkeding, GitHub, Twitter and others)
These modules help you to manage the user's data and flow along the app.
Session
To set and get data into session, inject crSession in your controllers and services.
.controller('MyCtrl', ['$scope', 'crSession', function MyCtrl($scope, crSession) {
  crSession.set("test", "content")
  console.log(crSession.get("test")); // content
  crSession.delete("test");
}])
Session data are stored into "default" namespace. You can define and use seprated namespaces. If you want to store product into a shopping cart, you can use a dedicated namspace.
.controller('MyCtrl', ['$scope', 'crSession', function MyCtrl($scope, crSession) {
  crSession.set("products", [a, b], "shopping");
  crSession.set("total", 122, "shopping");
  console.log(crSession.get("products", "shopping")); // [a, b]
  console.log(crSession.get("total", "shopping")); // 122
  crSession.purgeNamespace("namespace-new");
}])
You can destroy the whole session with purge method:
.controller('MyCtrl', ['$scope', 'crSession', function MyCtrl($scope, crSession) {
  crSession.purge();
}])
Please read official documentation for crSession.
Access Control List
crAcl lets you to define roles and rules around you routes. It works with events triggered by $state during route changes.
If the ACL role is not respected, the client is redirected to a customizable url.
Default roles
By default ROLE_USER (for autheticated users) and ROLE_GUEST (for guest people) are available. If you want to restrict the access to a route to just authorized users, define the state in this way:
.config(function config($stateProvider ) {
  $stateProvider.state( 'reserved-area', {
        url: '/reserved',
        views: {
            "main": {
                controller: 'ReservedCtrl',
                templateUrl: 'reserved/dashboard.tpl.html'
            }
        },
        data:{
          is_granted: ["ROLE_USER"]
       }
    });
})
Set the user's role
When you are ready (for example after a login), set the user role:
crAcl.setRole("ROLE_FREE");
From this moment the users will has access to routes restricted by is_granted: ["ROLE_USER"].
Please read official documentation for crAcl.
Restrict html elements to a role
A directive is available to restrict the visibility of DOM elements to a specific role:
<div cr-granted="ROLE_USER">If you are GUEST you cannot see this div</div>
Identity
The identity is who-you-are in the app along the whole life of your session. crIdentity works with crAcl and crSession to let you to
- set the user role
- change this role after a successful login action (with $auth and any other service)
- maintain alive this role and user's data until logout (also after page refresh or stand-by)
- destroy the user's session after logout
How to start the user's identity
After a successful login action, for example after a specific $http call to your authentication endpoint, you have to trigger a specific event:
.controller('MyCtrl', ['$scope', '$http', function MyCtrl($scope, $http) {
  //make a call to an auth service
  $http.post('/login-endpoint', {'username': 'bruce', 'password': 'batman'}).then(function(response)
    // trigger an event
    $scope.$broadcast('auth:login:success', {
      'role': 'ROLE_USER',
      'identity': {
        'username': 'bruce',
        'age': response.data.age
      },
      'provider': 'my-auth-provider'
    });
  );
}])
This event is catched by crIdentity that:
- it will assign ROLE_USER to the user
- it will store the the data into the session
- it will assign the data to $rootScope._identity object in order to let you get easily this data in the scopes
- it will broadcast the
auth:identity:successevent letting you to run your logic after the login
So in your /src/app/app.js you can manage the identity in this way:
.run(['$rootScope', 'crIdentity', function run($rootScope, crIdentity) {
  $rootScope.$on('auth:identity:success', function(event, data) {
    // your login after a login, for example a redirection
  });

  crIdentity.restore().then(function(identity) {
    // your login after identity restore (after page refresh or when a new tab is openend)
  });
});
Destroy the user's identity
In order to destroy the identity voiding the role and data stored by the session, trigger a specific event:
.controller('MyCtrl', ['$scope', '$http', function MyCtrl($scope, $http) {
  $scope.$broadcast('auth:logout:success');
}])
crIdentity will void the identity and will trigger the 'auth:purge:success' event letting you to add your logic after the purge.
Please read official documentation for crIdentity.
Authentication
Satelizer is a simple to use, end-to-end, token-based authentication module for AngularJS with built-in support for Google, Facebook, LinkedIn, Twitter, Yahoo, Windows Live authentication providers, as well as Email and Password sign-in. You are not limited to the sign-in options above, in fact you can add any OAuth 1.0 or OAuth 2.0 providers by passing provider-specific information during the configuration step.
In our opinion this is a very good library and it's very easy to use into ngStartup.
angular.module('MyApp')
  .controller('LoginCtrl', function($scope, $rootScope, $auth) {

    $scope.authenticate = function(provider) {
      $auth.authenticate(provider).then(function(response) {
        $rootScope.$broadcast('auth:identity:success', {role: response.role, provider: 'my-provider', identity: {}}); // the crIdentity event
      });
    };

});
# Analytics and translations
Overview
ngStartup includes Angulartics, and angular-translate in order to help you with states management and app localization.
This modules lets you to
- automatically tracks a new page view with GA and others analytics provider once you change the URL in your SPA
- track events either by calling the Angularytics service
- integrate translations from json files for different languages and use it in views and controller with specific filter
- switch to a different translation whenever you want
Angularytics
Angularytics is the solution to tracking PageViews and Events on your Single Page App.
All analytics frameworks are based on browser refreshes to track page views. This service wraps analytics so that you can track page views in ngStartup without a page refresh and without too much configuration.
Configuration
As prerequisite you need an account on your analytics provider (for example Google Analytics);
To enable trackying add this codes to the /src/app/app.js file in dependencies list.
angular.module(
  'ng-startup',
  [
    // other dependencies...
    'angulartics',
    'angulartics.google.analytics',
    // other dependencies...
  ]
)
Just it. Stats will be tracked. The snippet code provided by Google Analytics does an automatic pageview hit, but this is already done by Angulartics (unless you disable it) so make sure to delete the tracking line:
...
     ga('create', 'UA-XXXXXXXX-X', 'none'); // 'none' while you are working on localhost
     ga('send', 'pageview');  // DELETE THIS LINE!
   </script>
For advanced usage please read official documentation for Angulartics.
Translations
If you have to release an application for different languages, you need a translation strategy. Angular-Translate helps you making it very easy. ngStartup includes also a module to read remote json with translations (for example en_EN.json).
Configuration
ngStartup set the en_EN as default language getting it by the app configuration. You'll find a /src/i18n/en_EN.json file where put your translations. Of course you can add more files for different languages.
.config(['$translateProvider', function($translateProvider) {
  //set translation preferences
  $translateProvider.useStaticFilesLoader({
      files: [{
          prefix: 'i18n/',
          suffix: '.json'
      }]
  });
  $translateProvider.preferredLanguage(appConf.defaultLanguage);
  $translateProvider.useSanitizeValueStrategy('escaped');
}])
Language files and usage
Here an example of a translation file as /src/i18n/en_EN.json:
{
  'hello': 'Hello World!!!!',
  'logout': 'Click here to logout!'
}
Use the translate filter for translations:
<p>{{ 'hello' | translate }}</p>
<p ng-bind="{{ 'hello' | translate }}"></p>
Change language
When you need to change language, just use $translate (in controller or services):
$translate.use('fr_Fr');
It will load the /src/i18n/fr_Fr.json file changing all translations in the app in realtime.
# REST resources
Overview
Web and mobile apps usually work with remote resources (webservices and REST endpoints). Angular gives you some great tool make HTTP calls, but we have add other modules so you can choose the best for you.
$http
Of course you can use $http, a module by Angular to make HTTP calls to a specific endpoint.
Remember that cfpLoadingBar and crLoading work with $http in order to show spinners and loading bars. So any tool based on $http will activate these modules.
Please read official documentation for $http.
crRemote
ngUtile includes CrRemote, a module based on $http useful to create services that work with RESTful and remote resources.
Configuration
.config(function myAppConfig(crRemoteProvider) {

  //set endpoint
  crRemoteProvider.setEndpoint("http://api1.test.it");

  //set interceptors

  //request interceptor to edit data befor the call
  crRemoteProvider.addRequestInterceptor("default", function(data){
    data.params.session = "mysessionid";
    return data;
  });

  //succesful response interceptor
  crRemoteProvider.addResponseInterceptorSuccess("default", function(data){
    data.now = new Date();
    return data;
  });

  //wrong response interceptor
  crRemoteProvider.addResponseInterceptorError("default", function(data){
    console.log("aaaargh!", data);
    return data;
  });

})
Simple usage
You can user directly crRemote to make HTTP requests.
.controller('AppCtrl', function AppCtrl($scope, crRemoteHttp) {

    //retrieve product
    crRemoteHttp.get({
        resourceName: "/product"
    }).then(function(res) {
      console.log(res);
    }, function(error) {
      console.log(error);
    });

    //post a new entry
    crRemoteHttp.post({
        id: 22
        resourceName: "/product",
        data: {
          title: 'product',
          price: 22.5
        }
    }).then(function(res) {
      console.log(res);
    }, function(error) {
      console.log(error);
    });
});
You can use GET POST PUT PATCH and delete methods that return a promise. Successful callbacks return by default an object that contains data (body response), headers() (function that return headers) and status (http status code, exp 200);
Create injeactable modules
The best way is create dedicated module with specific methods for each remote resource.
  //define a new service
  .service('OrderResource', ['crRemoteHttp', function(crRemoteHttp){
   var service = crRemoteHttp.createService("order");

   service.changeStatus = function(id, status) {
     return service.patch({"id": id, data:{"status": status}});
   };

   return service;
  }])

  //use in a controller
  .controller('AppCtrl', function AppCtrl($scope, OrderResource) {
    OrderResource.changeStatus(123, 'shipped').then(function(res) {
     console.log(res);
    }, function(err) {
     console.log(err);
    })
  });
Call options
When you make a call(get, post, put, patch and delete) with crRemoteHttp or a module created on it you can define different options:
crRemoteHttp.post({
  id: 22 // id of resource, that will be used to create the endpoint url (see advanced settings below)
  resourceName: "/product", // the name of the resource, as the id is used to create the url
  data: { //data sent to endpoint in the body of call
    title: 'product',
    price: 22.5
  },
  cache: true //if the client has to cache response, false by default
  timeout: 5000 //milliseconds or a promise for the timeout, 0 by default (no timeout),
  params: { //object of Query params (?q=myname)
    q: 'myname'
  },
  headers: { //object of addiction request headers
    'x-myheader': '123'
  },
  auth: true //if false, an eventual Authorization header will be removed for the call; false by default
})
You can use the options also when you create a module:
  //define a new service
  .service('OrderResource', ['crRemoteHttp', function(crRemoteHttp){
   var service = crRemoteHttp.createService("order", {
     auth: true, // all calls by this module will use authorization header
     endpoint: 'test', // useful if you use different endpoint and you added another endpoint during configuration
     endpointBuilder: 'anotherbuild' // the function that creat the url of resource, see advanced settings for more info
   });
   return service;
  }])
Manage authorization
We recommend to use Satelizer to manage login and authetication. Satellizer adds Authentication header to http calls (and crRemote it's based on $http).
However, you case easily use directly $http to set authorization headers for your calls.
//in a controller or service
$http.defaults.headers.common['Authorization'] = 'Basic ' + $rootScope.user.authtoken; // it's just an example

OrderResource.get({'id': 22, 'auth': true}); //make a call using the Authorization header
Remember that the auth options is false by default, so you have to set it when you make a call or when you define a new service.
Advanced settings
During configuration you can set different endpoints, interceptors and builders that will be used by your service.
.config(function myAppConfig(crRemoteProvider) {

  //set different endpoints
  crRemoteProvider.setEndpoint("http://production.mydomain.com/api/"); //add as default endpoint
  crRemoteProvider.setEndpoint("http://dev01.mydomain.com/api/", "test"); //add as default endpoint


  //set a new interceptor
  crRemoteProvider.addResponseInterceptorSuccess("paginator", function(response){
    //add to response an object with custom values, in this example a simply paginator and counter
    response.paginator = {
      total: response.data.length,
      page: (response.data.length - (response.data.length & 10) ) / 10 + 1
    };
    return data;
  });

  /**
  by default, crRemoteHttp build endpoint in this way: endpoint + resource name + / + id (if set) + query (if set)
  example https://api.mydomain.com/product/22?status=enabled
  you can rewrite it:
  */

  crRemoteProvider.addEndpointBuilder('newbuilder',  function(endpoint, resourceName, resourceId, params) {
    return endpoint + id + "/" + resourceName; //it will return https://api.mydomain.com/22/product
  });
})


//define a new service with previous settings
.service('OrderResource', ['crRemoteHttp', function(crRemoteHttp){
 var service = crRemoteHttp.createService("order", {
   endpointBuilder: 'newbuilder',
   endpoint: 'test',
   responseInterceptorSuccess: 'paginator'
 });

 service.changeStatus = function(id, status) {
   return service.patch({"id": id, data:{"status": status}});
 };

 return service;
}])
# Graphics and layout
Overview
ngStartup helps you to create modern and responsive web and mobile apps. To do that, it includes some external libraries and tools, from Bootstrap to Font Awesome, from stunning Loading bars to scripting tools such as Less and Saas. Configure and use what's the best for you.
Bootstrap and Font Awesome
ngStartup uses Bootstrap 3.x and Font Awesome 4.x to let you to create high quality and responsive web applications. Of course, if you prefer, you can remove this dependencies from bower.json and you app.
Bootstrap
Thanks to Bootstrap, you have a lot of different html, css and js components and a powerful and responsive grid system. You can find all documentation about it on Bootstrap webiste.
However, as you know, javascript plugins of Bootstrap are written with jQuery. Thanks to another dependency injected in the app (UI Bootstrap) you can use Bootstrap's plugins directly with Angular.
Here an example of the usage of programmable alerts:
<div ng-controller="AlertDemoCtrl">
  <alert ng-repeat="alert in alerts" type="{{alert.type}}" close="closeAlert($index)">{{alert.msg}}</alert>
  <button type="button" class='btn btn-default' ng-click="addAlert()">Add Alert</button>
</div>
.controller('AlertDemoCtrl', ['$scope', function ($scope) {
  $scope.alerts = [
    { type: 'danger', msg: 'Oh snap! Change a few things up and try submitting again.' },
    { type: 'success', msg: 'Well done! You successfully read this important alert message.' }
  ];

  $scope.addAlert = function() {
    $scope.alerts.push({msg: 'Another alert!'});
  };

  $scope.closeAlert = function(index) {
    $scope.alerts.splice(index, 1);
  };
}]);
Please refer to official documentation of UI Bootstrap.
Font Awesome
Thanks to Font Awesome you have over 400 scalable vector icons ready to be used in your application:
<i class="fa fa-plus"></i>
Please refer to official documentation of Font Awesome for the full list of icons.
Sass/Less supports
ngStartup supports fantastic tools for scripteable css such as Less and SaaS. These tools help you to manage better your styles and quickly changes colors, dimensions, font and box values along the whole application.
Bootstrap supports both Less and SaaS, so choose the best for you when start a new project. By default, ngStartup uses Less compiler to create .css files.
/src/less/base.less (and /src/saas/base.scss)
This file contains basic styles definitions and some helper classes. What the chapter Helper classes and CSS tricks below for more info. We suggest to don't edit this file, but of course you can do that fitting your needs.
/src/less/variables.less (and /src/saas/variables.scss)
Edit this file to change Bootstrap (or others) variables to fit your design needs. For example, if you want change the "red" of "danger" buttons an texts in Bootstrap, you have to write:
@brand-danger: #ff0000;
If you're working on an application that could have different "design versions" (for example a network of similar websites with different fonts and color) we suggest to set here you variables.
/src/less/main.less (and /src/saas/main.scss)
Edit this file adding your styles and classes. It works with base and variables files and will be compiled with them. This is the best place to store the majority of your css rules and settings.
Modules .less and .scss files
Remember that all .less and .scss files in /src/app/ and /src/common/ files are added to the list of files that will be compiled during development and production.
If you had added a file to a module, you don't need to specify where is it. Grunt will compile it.
External .less and .scss files
Instead, if you have to add a .less or .scss file from an external dependency, for example from bower_components, then **you have to add it to /build.config.js in project root.
It contains all lists of files used by the application to produce the definitive app ready for testing and production. Add your own file to the list:
Switching Less and SaaS
Edit the head of /config/build.config.js changin the key css_parse from less to sass.
Css Tricks
The /src/less/base.less file adds some css classes and tricks.
Margin and padding classes.
Several classes are available with this sytax:
.margin-5       // 5px margin on all sides
.margin-5-0-0-0 // 5px margin only on top, 0 on other sides
.margin-x-5-x-x // 5px margin on the right, other sides inherited
// etc etc
All these classes are from 5 to 200 and available also for padding, for example `padding-x-x-x-75 (75px padding on the left).
Other tricks
Following are also available:
.no-cursor     // disable curson on a, button or other element
.text-white   // color #fff
.bg-white     // background-color #fff
.text-black   // color #000
.bg-black     // background-color #000
There are also some rules on button and a element to prevent outline and focus border on mobile devices.
Loading Bar
ngStartup integrates the fantastic module cfpLoadingBar, an angularJS service that lets you to show a css (and fully stlable) loading bar on the top of the page and/or a spinner in the center of the page during routing.
It's activeted when:
- during $http calls (also nested from the first to the last)
- manually (attachable to the route changes)
How to configure and use it
If you want use only the spinner or the loading bar, edit your /src/app/app.js configuration:
.config(['cfpLoadingBarProvider', function(cfpLoadingBarProvider) {
  cfpLoadingBarProvider.includeSpinner = false; // to disable spinner
  cfpLoadingBarProvider.includeBar = false;     // to disable loading bar
}])
We suggest to activate the loading bar during the route changes. Always in the /src/app/app.js in the App controller (the main controller that works on tag):
.controller('AppCtrl', ['$scope','$rootScope', '$location', '$state', 'cfpLoadingBar',
  function AppCtrl($scope, $rootScope, $location, $state, cfpLoadingBar) {
    $scope.$on('$stateChangeSuccess', function(event, toState, toParams, fromState, fromParams) {
        cfpLoadingBar.complete();
    });
    $scope.$on('$stateChangeStart', function(event, toState, toParams, fromState, fromParams) {
        cfpLoadingBar.start();
    });
}]);
Styles
The spinner and bar styles are defined in the loading-bar css, but you can easily rewrite them in your main.css.
#loading-bar .bar {
  -webkit-transition: width 350ms;
  -moz-transition: width 350ms;
  -o-transition: width 350ms;
  transition: width 350ms;

  background: #29d;
  position: fixed;
  z-index: 10002;
  top: 0;
  left: 0;
  width: 100%;
  height: 2px;
  border-bottom-right-radius: 1px;
  border-top-right-radius: 1px;
}

#loading-bar .peg {
  position: absolute;
  width: 70px;
  right: 0;
  top: 0;
  height: 2px;
  opacity: .45;
  -moz-box-shadow: #29d 1px 0 6px 1px;
  -ms-box-shadow: #29d 1px 0 6px 1px;
  -webkit-box-shadow: #29d 1px 0 6px 1px;
  box-shadow: #29d 1px 0 6px 1px;
  -moz-border-radius: 100%;
  -webkit-border-radius: 100%;
  border-radius: 100%;
}
#loading-bar-spinner {
    display: block;
    left: 46%;
    position: fixed;
    top: 33%;
    z-index: 10002;
    padding: 10px;
    border-radius: 3px;
    background: rgba(0,0,0,0.5);
    color:#fff;
}
#loading-bar-spinner .spinner-icon {
  color:#fff;
  border-top-color:  #fff;
  border-left-color: #fff;
  width:20px;
  height:20px;
}
Spinner directive
Thanks to the crLoading module that works with the angular-loading-bar it's available a directive that you can use on button and form. That directive:
- if used on a button, disable it after user click and show a spinner inside the button (for at least 300ms and until the $http request ends)
- if used on a form, disable submit buttons after the submit action showing the spinner as for the button above
It's very easy to use:
<!-- button example -->
<button class="btn" cr-loading>Login</button>

<!-- form example -->
<form cr-loading>
  <input type="text" >
  <button class="btn" type="submit">Search</button>
</form>
You can edit the class of the element that will be injected into the button (by default uses a spinner by Font Awesome)
.config(["crLoadingProvider", function(crLoadingProvider){
  crLoadingProvider.setClickSpinnerClass("my custom class");
});
Please read official documentation about crLoading usage.
Animations
ngStartup defines in /src/less/base.less some classes that you can use in your views to activate animations during route changes and ng-repeat, ng-show and ng-hide events.
Example
For fading animations:
<!-- in your views -->
<p ng-repeat="article in articles" class="fading-item">{{ article.title }}</p>

<!-- in /src/index.html -->
<div ui-view="main" class="fading-view" ></div>
For slide-out animations:
<!-- in your views -->
<p ng-repeat="article in articles" class="sliding-item">{{ article.title }}</p>

<!-- in /src/index.html -->
<div ui-view="main" class="sliding-view" ></div>
Add yours:
This is an example of code for new animation that you can add everywhere in you less/sass files.
/** fading animation, just add fading-item to ng-repeat and ng-show items */
.fading-item.ng-enter, .fading-item.ng-move {
  -webkit-transition:0.5s linear all;
  -moz-transition:0.5s linear all;
  -o-transition:0.5s linear all;
  transition:0.5s linear all;
  opacity:0;
}


.fading-item.ng-enter.ng-enter-active,
.fading-item.ng-move.ng-move-active {
  opacity:1;
}


.fading-item.ng-leave {
  -webkit-animation:0.5s fading_animation;
  -moz-animation:0.5s fading_animation;
  -o-animation:0.5s fading_animation;
  animation:0.5s fading_animation;
}

@keyframes fading_animation {
  from { opacity:1; }
  to { opacity:0; }
}

@-webkit-keyframes fading_animation {
  from { opacity:1; }
  to { opacity:0; }
}

@-moz-keyframes fading_animation {
  from { opacity:1; }
  to { opacity:0; }
}

@-o-keyframes fading_animation {
  from { opacity:1; }
  to { opacity:0; }
}


/** view animation when route changes (fading animation, to activate add fading-view to ui-vide div) */
[ui-view].ng-enter.fading-view {
  -webkit-transition:0.2s linear all;
  -moz-transition:0.2s linear all;
  -o-transition:0.2s linear all;
  transition:0.2s linear all;
  opacity:0;
}

[ui-view].ng-enter.fading-view {
  opacity: 0;
}

[ui-view].ng-enter-active.fading-view {
  opacity: 1;
}

[ui-view].ng-leave.fading-view {
  opacity: 0;
}

[ui-view].ng-leave-active.fading-view {
  opacity: 0;
}
Assets/Fonts/Images
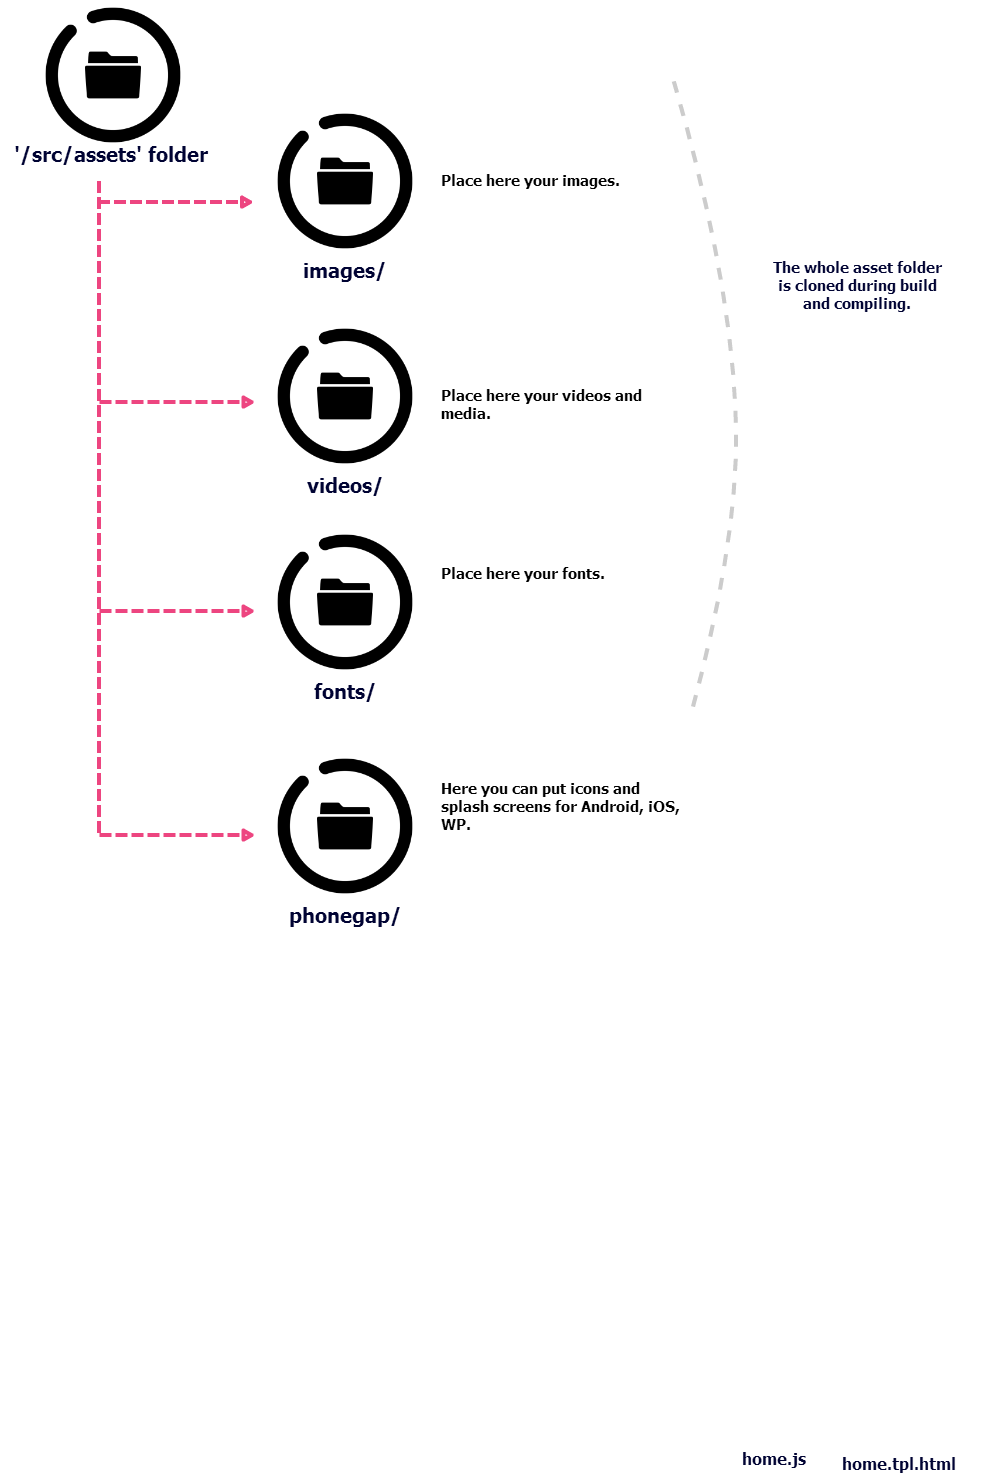
Fonts, images, videos and other assets can be placed in /src/assets/ folder.
This is the structure:
.
└── src
    └── assets
        ├── images            // images
        ├── videos            // videos and media
        ├── fonts             // ttf, eot and other fonts
        └── phonegap          // icons and splash screen for cordova/phonegap
Assets are automatically moved by Grunt to dist folders during building and compiling.
# Deploy
Overview
ngStartup follows all steps of your development, the deploy is the last important task that moves your code to production.
Prepare for production
$ grunt compile:web
$ grunt compile:mobile
This commands prepare /dist/compile/web and /dist/compile/mobile directories. The process:
- maintains lines of code between devcode: compile, devcode: web or devcode: mobile comments
- creates only one js file (named with project name and version) with all javascript (externals libraries and your angular files) miniefied and compressed
- creates only one js file (named with project name and version) with css compiled and compressed
bin/
├── assets
│   ├── fonts                   // fonts directory
│   ├── images                  // images direcotry
│   ├── ng-startup-0.0.2.css    // minified, concat and compressed css
│   ├── ng-startup-0.0.2.js     // minified, concat and compressed js
│   └── phonegap                // phonegap assets
├── i18n                        // translations
│   └── en_EN.json
└── index.html                  // the SPA index
This is an example of code ready to production.
0.0.2 is the current version of your application, this value is stored into the package.json under the key version.
S3
S3 provides to developers and IT teams a secure, durable, highly-scalable object storage. Amazon S3 is easy to use, with a simple web services interface to store and retrieve any amount of data from anywhere on the web. It can used also to host a static website with own domain url. (For example the ng-startup documentation website is hosted on S3).
To upload the compiled version of the app to S3, edit the /config/secret.json file with your AWS keys, bucket name and region:
{
  "aws": {
      "accessKeyId":  "your-api-key",
      "secretAccessKey": "your-secret-key",
      "bucket": "ngstartup-bucket",
      "region": "eu-west-1" // Ireland
  }
}
then run:
grunt s3
# Cordova/Phonegap
Overview
Cordova is a set of device APIs that allows mobile developers to access native device function such as the camera or accelerometer from JavaScript. Combined with a UI framework such as jQuery Mobile or Dojo Mobile or Sencha Touch, this allows a smartphone app to be developed with just HTML, CSS, and JavaScript.
Angular is wrote in Javascript and we can use it to build Mobile Application. ngStartup help you to write and compile it!
Coding with ngCordova
Configuration
dist/phonegap.config.xml is the cordova manifest, this tool reads it and compile your application for different OS: Android, Windows 8, iOS..
Open this file and replace few custom configuration:
Personal information
    <name>AppName</name>
    <description>
        Description
    </description>

    <author href="http://" email="xyz@xyzxyzxyzxyz.xyz">
        Author
    </author>

    <preference name="permissions"                value="none"/>
Platform and application preference
    <preference name="phonegap-version"           value="3.7.0" />          <!-- all: current version of PhoneGap -->
    <preference name="orientation"                value="portrait" />        <!-- all: default means both landscape and portrait are enabled -->
    <preference name="target-device"              value="universal" />      <!-- all: possible values handset, tablet, or universal -->
    <preference name="fullscreen"                 value="true" />           <!-- all: hides the status bar at the top of the screen -->
    <preference name="webviewbounce"              value="false" />           <!-- ios: control whether the screen 'bounces' when scrolled beyond the top -->
    <preference name="prerendered-icon"           value="true" />           <!-- ios: if icon is prerendered, iOS will not apply it's gloss to the app's icon on the user's home screen -->
    <preference name="stay-in-webview"            value="false" />          <!-- ios: external links should open in the default browser, 'true' would use the webview the app lives in -->
    <preference name="ios-statusbarstyle"         value="black-opaque" />   <!-- ios: black-translucent will appear black because the PhoneGap webview doesn't go beneath the status bar -->
    <preference name="detect-data-types"          value="true" />           <!-- ios: controls whether data types (such as phone no. and dates) are automatically turned into links by the system -->
    <preference name="exit-on-suspend"            value="false" />          <!-- ios: if set to true, app will terminate when home button is pressed -->
    <preference name="show-splash-screen-spinner" value="false" />           <!-- ios: if set to false, the spinner won't appear on the splash screen during app loading -->
    <preference name="auto-hide-splash-screen"    value="true" />           <!-- ios: if set to false, the splash screen must be hidden using a JavaScript API -->

    <preference name="AutoHideSplashScreen" value="true" />
    <preference name="FadeSplashScreen" value="true" />
    <preference name="fade-splash-screen-duration" value="5" />

    <preference name="disable-cursor"             value="false" />          <!-- blackberry: prevents a mouse-icon/cursor from being displayed on the app -->
    <preference name="android-minSdkVersion"      value="14" />              <!-- android: MIN SDK version supported on the target device. MAX version is blank by default. -->
    <preference name="android-installLocation"    value="auto" />           <!-- android: app install location. 'auto' will choose. 'internalOnly' is device memory. 'preferExternal' is SDCard. -->
Plugins
    <gap:plugin name="com.adobe.plugins.gaplugin" version="2.4.0" />
    <gap:plugin name="nl.x-services.plugins.launchmyapp" version="3.2.0">
        <param name="URL_SCHEME" value="CHANGEWITHYOURAPPNAME" />
    </gap:plugin>
Another important service that we use to compile the application is PhoneGapBuid. Please edit /config/secret.json file adding your credentials in order to upload and compile the app from your desktop;
{
  "phonegap": {
      "appId": "", //required
      "token": "", //required
       "keys": {
          "ios": { "password": "" },
          "android": { "key_pw": "", "keystore_pw": "" }
      }
  }
}
Grunt Tasks
There are two important tasks to manage your mobile project:
$ grunt build:mobile
It builds a development version of your mobile app in /dist/build/mobile, then upload it to your Phonegap Build account, waits for building, then download it into /dist and install it on your Android device (if connected on usb, you can alwasy download the apps built on http:build.phonegap.com).
$ grunt compile:mobile
It compile the ready-for-production version of your mobile app in /dist/compile/mobile, then upload it to your Phonegap Build account, waits for building, then download it into /dist and install it on your Android device (if connected on usb, you can alwasy download the apps built on http:build.phonegap.com).

Remember thet both build and compile:
- maintain lines of codes betweeb // devcode: mobile and // enddev comments
- push your app code into the PhoneGap Build service starting compilation
- wait for compilation ending
- download the Android version and if your smartphone is connected at PC will install it on device.
$ grunt shell:androidLog
This command tail android device log if it is connected at PC
Assets/Fonts/Images/Icons
ng-startup/src/assets/phonegap
.
├── icon                // icons directory
│   └── android         // specific for android
├── icon.png
└── screen              // splashscreen directory
    ├── android         // specific for android
    ├── ios             // specific for ios
    └── splash.png
src/assets/phonegap contains a lot of images, splashscreen and assets about your mobile application, they are the default Phonegap assets, you can change them to customize your application.
Dependencies
Your mobile application requires a way to include javascript/css files into the index.html, we use build.config.js to describe all
dependencies.
To manage your phonegap dependencies you should update the key phonegap_files.
# Licence and FAQ
Browser compatibility
License
Copyright (c) 2015 Corley S.r.l.

Permission is hereby granted, free of charge, to any person obtaining a copy
of this software and associated documentation files (the "Software"), to deal
in the Software without restriction, including without limitation the rights
to use, copy, modify, merge, publish, distribute, sublicense, and/or sell
copies of the Software, and to permit persons to whom the Software is
furnished to do so, subject to the following conditions:

The above copyright notice and this permission notice shall be included in
all copies or substantial portions of the Software.

THE SOFTWARE IS PROVIDED "AS IS", WITHOUT WARRANTY OF ANY KIND, EXPRESS OR
IMPLIED, INCLUDING BUT NOT LIMITED TO THE WARRANTIES OF MERCHANTABILITY,
FITNESS FOR A PARTICULAR PURPOSE AND NONINFRINGEMENT. IN NO EVENT SHALL THE
AUTHORS OR COPYRIGHT HOLDERS BE LIABLE FOR ANY CLAIM, DAMAGES OR OTHER
LIABILITY, WHETHER IN AN ACTION OF CONTRACT, TORT OR OTHERWISE, ARISING FROM,
OUT OF OR IN CONNECTION WITH THE SOFTWARE OR THE USE OR OTHER DEALINGS IN
THE SOFTWARE.
FAQ
Cooming soon.